IR - Infra-red receiver and emitter
Preparation
- Ameba x 1
- Grove – Infrared Receiver x 1
- Grove – Infrared Emitter x 1
Principle
Infra-red refers to the invisible light with wavelength 770nm~1mm. It is commonly used in our life, for example the remote control in our home.
In general, the infra-red emitter and receiver specify the frequency used in transmission. There are some widely used frequency regulations such as NEC, Philips RC5, RC6, RCMM, Toshiba, Sharp, JVC, Sony SIRC,…etc. Among them, NEC uses 38KHz frequency and is commonly used in appliances.
The demodulator in the IR receiver outputs 0V when it receives signals with specified frequency, otherwise it outputs 3.3V(or 5V). For the IR emitter, it needs to emit signal with specified frequency (generally PWM signal), since IR receiver would only respond to the specified frequency,
The figure below shows a complete Infra-red signal emitted from the IR emitter:
- First it sends the start signal, which contains a start high and a start low. Start high is PWM signal with frequency 38KHz. Start low is digital signal output, usually we output 0V signal for start low.
- Then it sends the data a byte at a time. A byte is sent in the order from LSB (Least Significant Bit) to MSB (Most Significant Bit). A bit 1 is represented by a 560us-long PWM signal, and stop for 1.69 ms. A bit 0 is represented by a 560us-long PWM signal, and stop for 560 us.
- When the data transmission is finished, send a bit 1 as the stop bit.
At the receiver side, through demodulation, the received PWM signals are converted to general digital input:
And those signals other than PWM signals, are put at 3.3V (or 5V).
Example: IR receiver
Open the example in “File” -> “Examples” -> “AmebaIRSendRecv” -> “recv”
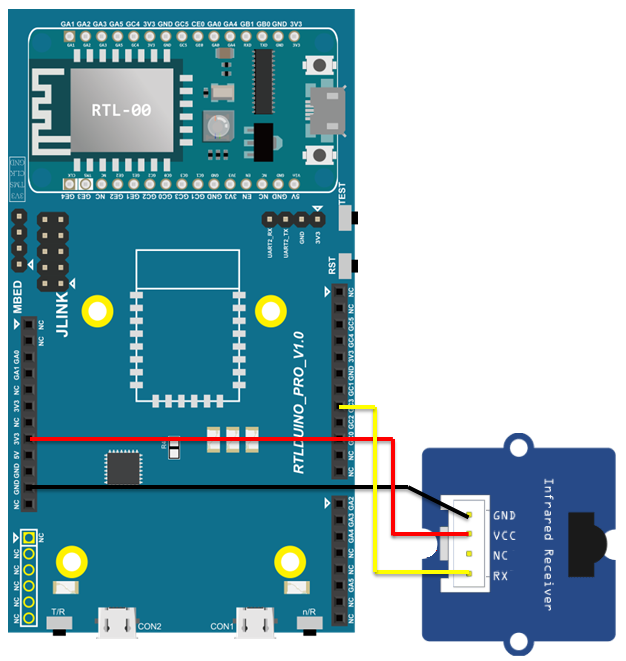
In this example, we use Grove Infrared Receiver, other infra-red receiver works similarly. In general, we will use 3 pins: VCC(connects to 3.3V), GND, RX. In the example, we connect RX to D3 (which has GPIO Interrupt function).
Wiring diagram:

RTL8710 Wiring diagram:
Compile the code and upload to Ameba, then press reset.
If you have NEC remote control in hand, you can test that whether the Ameba IR receiver works. Or you can follow next example to use another Ameba board to make an IR emitter yourself. Note that the received messages of the IR receiver will be shown on the serial monitor.
Example: IR emitter
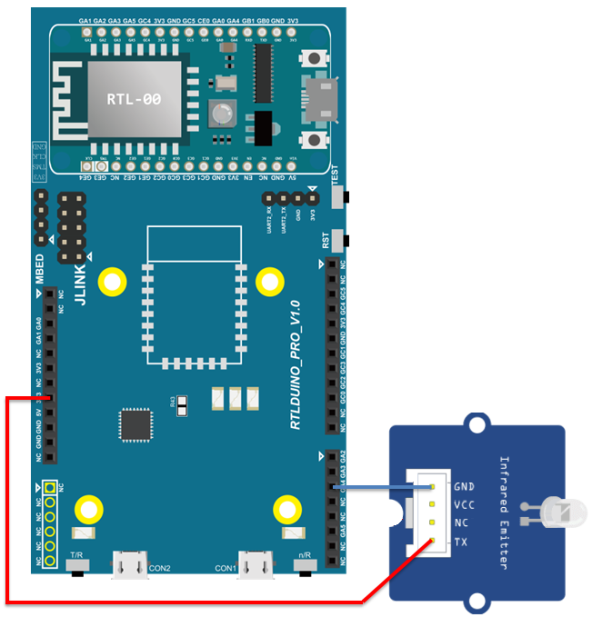
To transmit 38KHz signal in real time, Ameba uses TX of UART to emit the signal. Hence, when we are using Ameba to emit IR signal, D0 pin (UART RX) would be unavailable.
Following is the wiring diagram:

However, since the TX of UART is usually on 3.3V, this leads to unnecessary power consumption. Therefore, we rearrange the wires to connect Ameba UART TX to the GND pin of Grove Infrared Emitter, and connect the signal wire of emitter to 3.3V:
RTL8710 Wiring Diagram:
In this case, when the emitter is not emitting signal, GND and TX are both at 3.3V, voltage difference is 0.
Open the example “File” -> “Examples” -> “AmebaIRSendRecv” -> “send”.
Compile and upload to Ameba, and press reset.
In this example, the IR emitter emits signal every 2 seconds. You can test it with the previous IR receiver example.
Code Reference
- IR receiver
First, we have to specify the pin used to receive data. Since it needs GPIO interrupt, we have to select a pin with GPIO interrupt function. We use D3 pin in the example.IR.Init(pinRecv)
In the loop, we keep checking if there is incoming signal.IR.IsDta()
When we receive signal, put the data into user buffer.IR.Recv(dta)
The format of the buffer:- Byte 0: Data length of whole packet.
- Byte 1: Length of start high, unit is 50us.
- Byte 2: Length of start low, unit is 50us.
- Byte 3: The stop length after the PWM signal when the data bit is 1, unit is 50us.
- Byte 4: The stop length after the PWM signal when the data bit is 0, unit is 50us.
- Byte 5…: Data.
- IR emitter
Use Send() API to transmit data. The first argument is the data to be transmitted, and the second argument is the frequency(unit is 1K), in the example we use 38KHz.IR.Send(dtaSend, 38)
The transmission format of the data:- Byte 0: Data length of whole packet.
- Byte 1: Length of start high, unit is 50us.
- Byte 2: Length of start low, unit is 50us.
- Byte 3: The stop length after the PWM signal when the data bit is 1, unit is 50us.
- Byte 4: The stop length after the PWM signal when the data bit is 0, unit is 50us.
- Byte 5: Length of data to transmit.
- Byte 6…: Data to transmit.
