Introduction
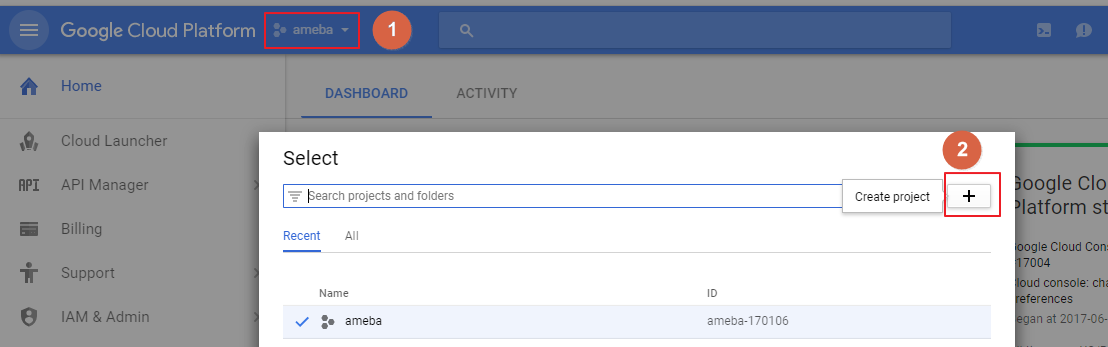
 Step1: In the Cloud Platform Console, click the project
Step2: At the project list page, select a project or click the Create project
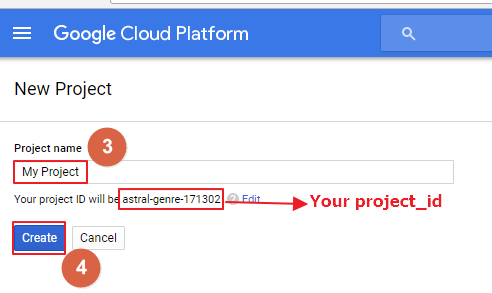
Step3: Input a Project name
Step4: Click Create
Remember the project_id which will be used in both Device Manager and Device.
2. Enable billing for your project
Enable the billing for your project to use Google Cloud Platform features.
https://support.google.com/cloud/answer/6293499#enable-billing
3. Enable the Cloud IoT Core API
Register your application for Google Cloud IoT API in Google Cloud Platform.
Step1: In the Cloud Platform Console, click the project
Step2: At the project list page, select a project or click the Create project
Step3: Input a Project name
Step4: Click Create
Remember the project_id which will be used in both Device Manager and Device.
2. Enable billing for your project
Enable the billing for your project to use Google Cloud Platform features.
https://support.google.com/cloud/answer/6293499#enable-billing
3. Enable the Cloud IoT Core API
Register your application for Google Cloud IoT API in Google Cloud Platform.
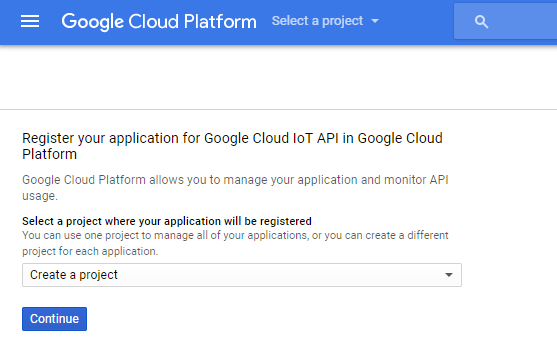 Select the project and click Continue.
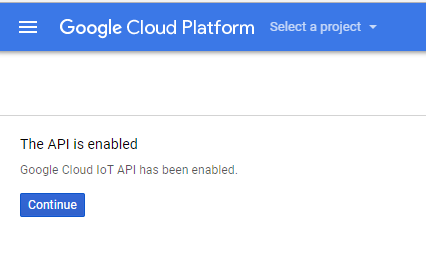 Click Continue, it will return to the DASHBOARD.
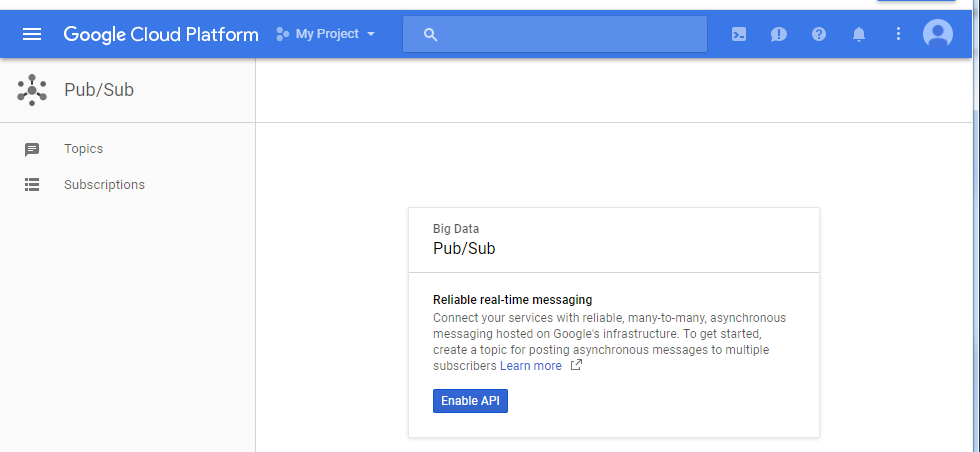
4. Create a Cloud Pub/Sub topic in the Cloud Platform Console
Create a Cloud Pub/Sub topic for the Pub/Sub service.
Step 1: Go to the Cloud PUB/SUB topics page, and Enable API
Click Continue, it will return to the DASHBOARD.
4. Create a Cloud Pub/Sub topic in the Cloud Platform Console
Create a Cloud Pub/Sub topic for the Pub/Sub service.
Step 1: Go to the Cloud PUB/SUB topics page, and Enable API
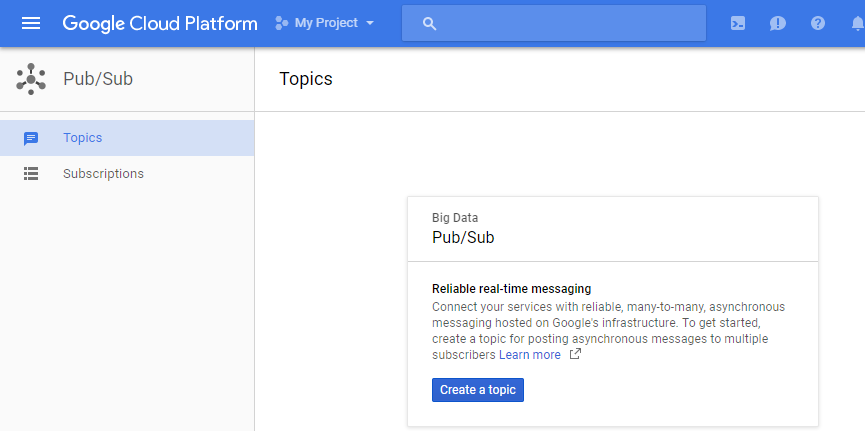
 Step 2: Create a topic
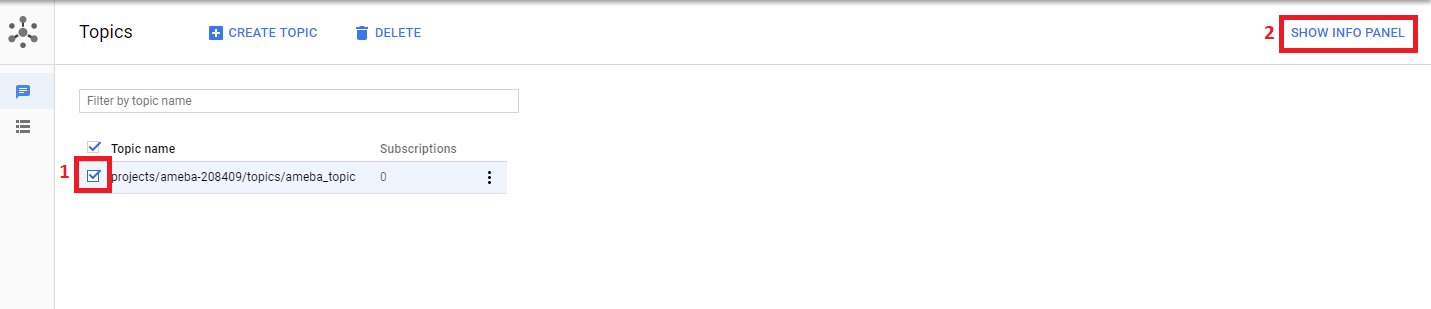
 Step 3: Input a topic name and click CREATE
Remember the topic name for later usage.
Step 4: In the Cloud Platform Console, select the topic and click the “SHOW INFO PANEL” button at the top of the page. This will open the IAM permissions editor in the right side panel.
Step 3: Input a topic name and click CREATE
Remember the topic name for later usage.
Step 4: In the Cloud Platform Console, select the topic and click the “SHOW INFO PANEL” button at the top of the page. This will open the IAM permissions editor in the right side panel.
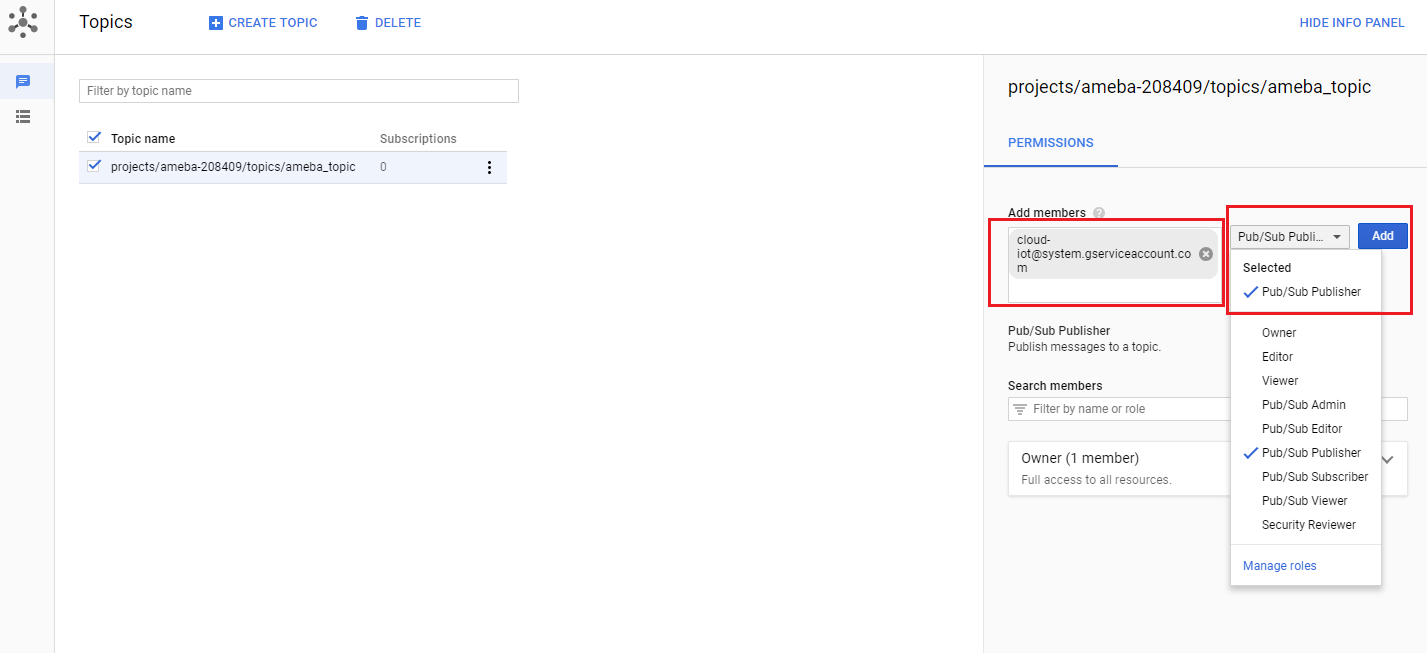
 Step 5: Add the member cloud-iot@system.gserviceaccount.com with the role Pub/Sub
Publisher. Then click Add.
Step 5: Add the member cloud-iot@system.gserviceaccount.com with the role Pub/Sub
Publisher. Then click Add.
 Setup the device
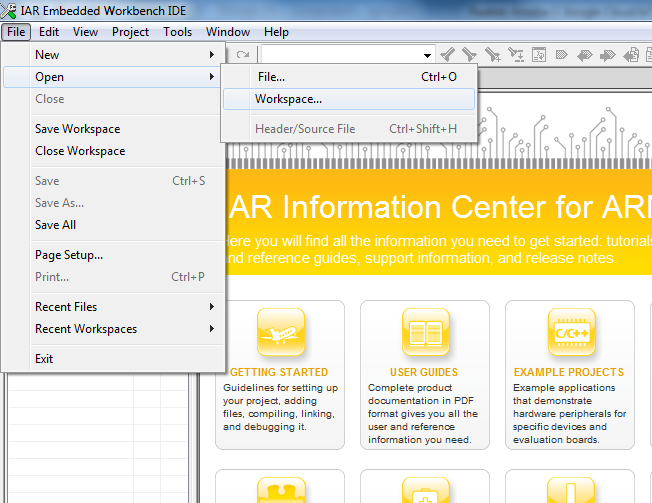
 Step 2: Open IAR Workbench and open project, click File -> Open -> Workspace, then select project.eww in sdk-ameba-v4.0b_without_NDA\project\realtek_ameba1_va0_example\EWARM-RELEASE
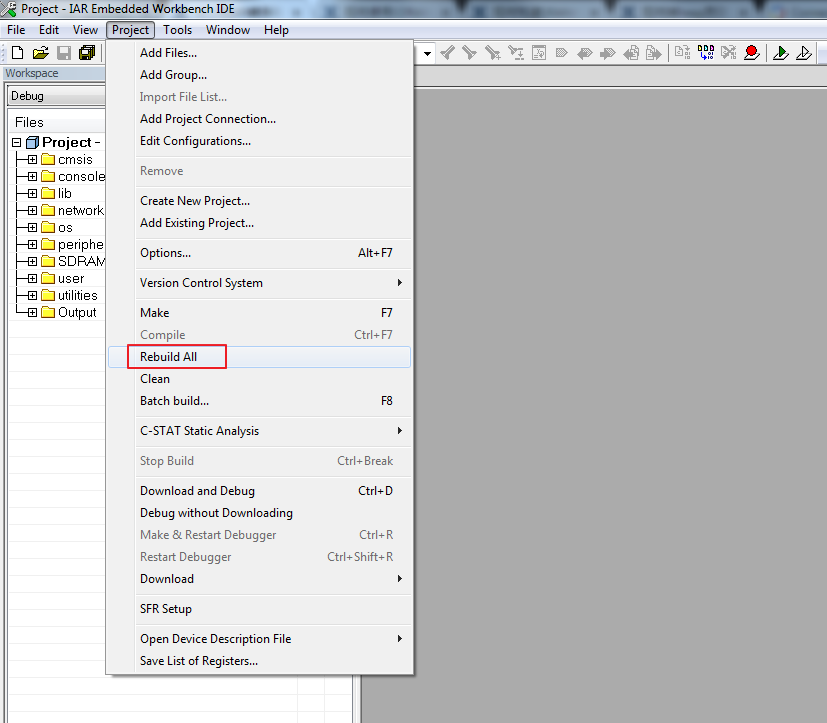
 Step3: Build project, click Project -> Rebuild All
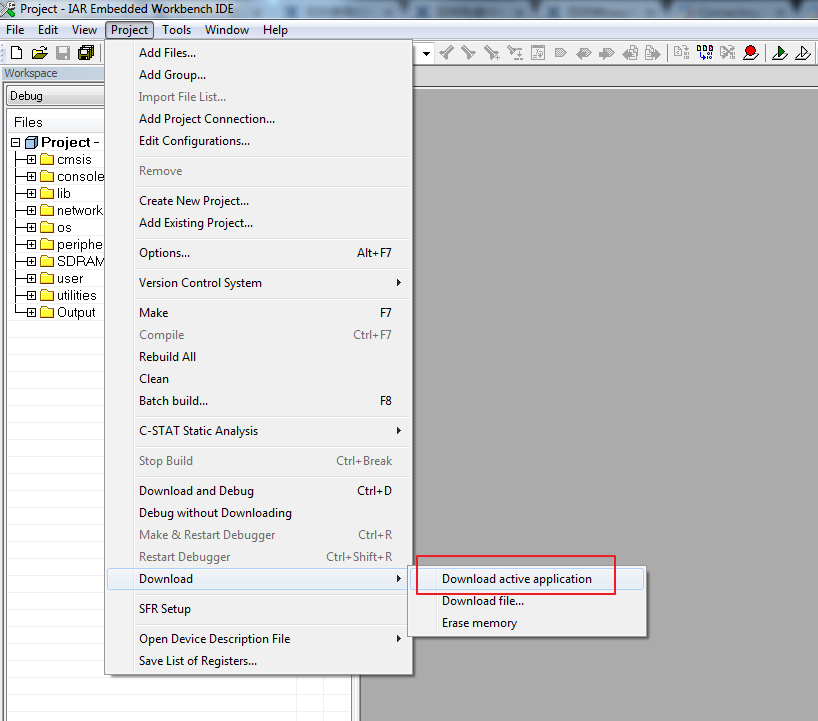
 Step 4: Download code, click Project -> Download -> Download active application
 2. GCC
You can refer UM0096 in sdk-ameba-v4.0b_without_NDA_GCC_V1.0.0\doc\ UM0096 Realtek Ameba build environment setup – gcc.pdf to setup the GCC build environment, it illustrates how to build the SDK under GCC environment on both Windows and Linux platform.
Here just shows how to build on Windows 7 platform by using Cygwin.
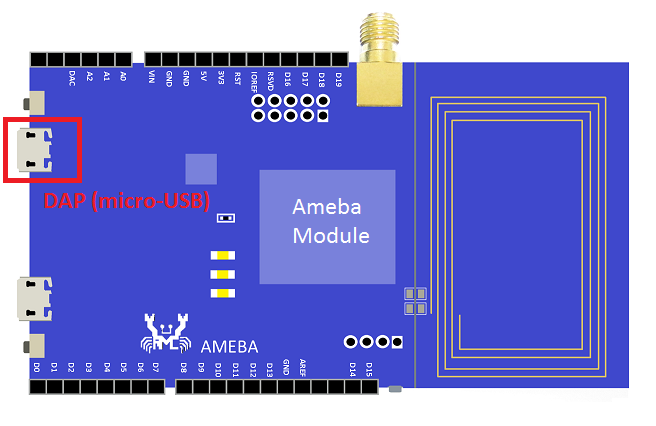
Step 1: Connect board to the PC with micro-USB cable. It requires installing “serial to USB driver” which can be found in sdk-ameba-v4.0b_without_NDA_GCC_V1.0.0\tools\serial_to_usb\ mbedWinSerial_16466.
2. GCC
You can refer UM0096 in sdk-ameba-v4.0b_without_NDA_GCC_V1.0.0\doc\ UM0096 Realtek Ameba build environment setup – gcc.pdf to setup the GCC build environment, it illustrates how to build the SDK under GCC environment on both Windows and Linux platform.
Here just shows how to build on Windows 7 platform by using Cygwin.
Step 1: Connect board to the PC with micro-USB cable. It requires installing “serial to USB driver” which can be found in sdk-ameba-v4.0b_without_NDA_GCC_V1.0.0\tools\serial_to_usb\ mbedWinSerial_16466.
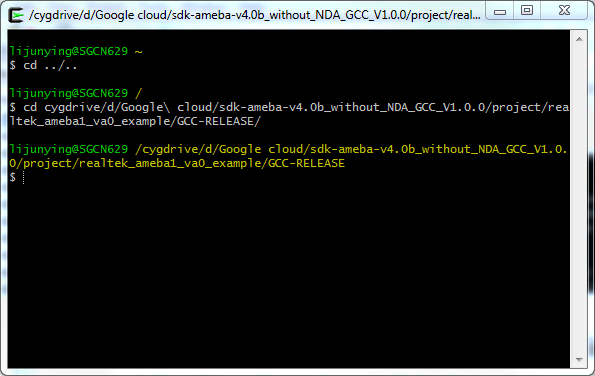
 Step 2: Open Cygwin terminal and use cd command to change directory to project\realtek_ameba1_va0_example\GCC-RELEASE
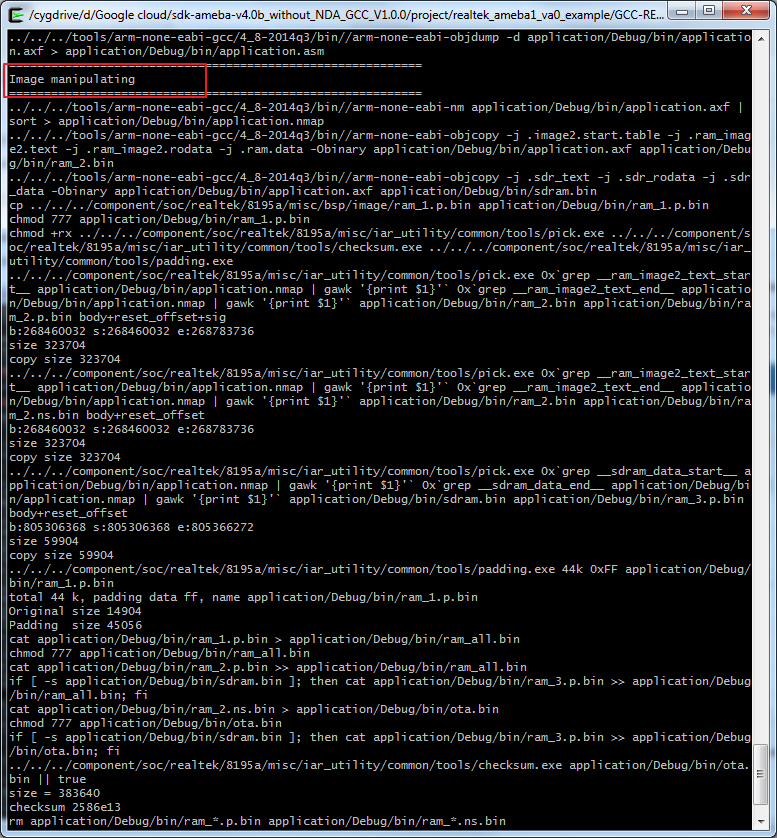
 Step3: Build project, use make command.
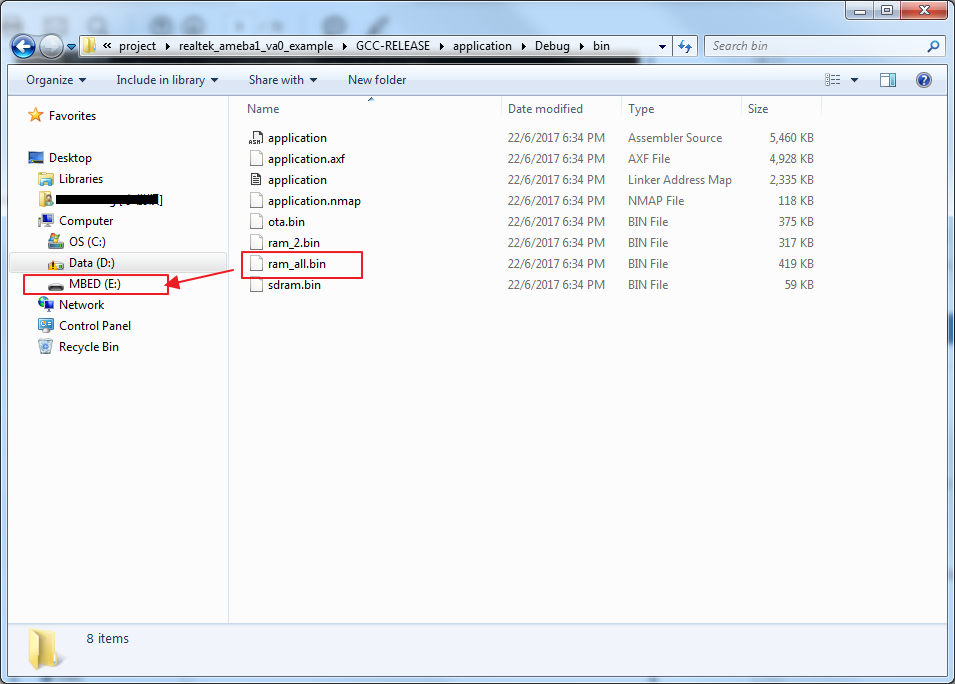
 Step 4: Download code. Copy the image file ram_all.bin in project\realtek_ameba1_va0_example\GCC-RELEASE\application\Debug\bin to the board which is the MBED
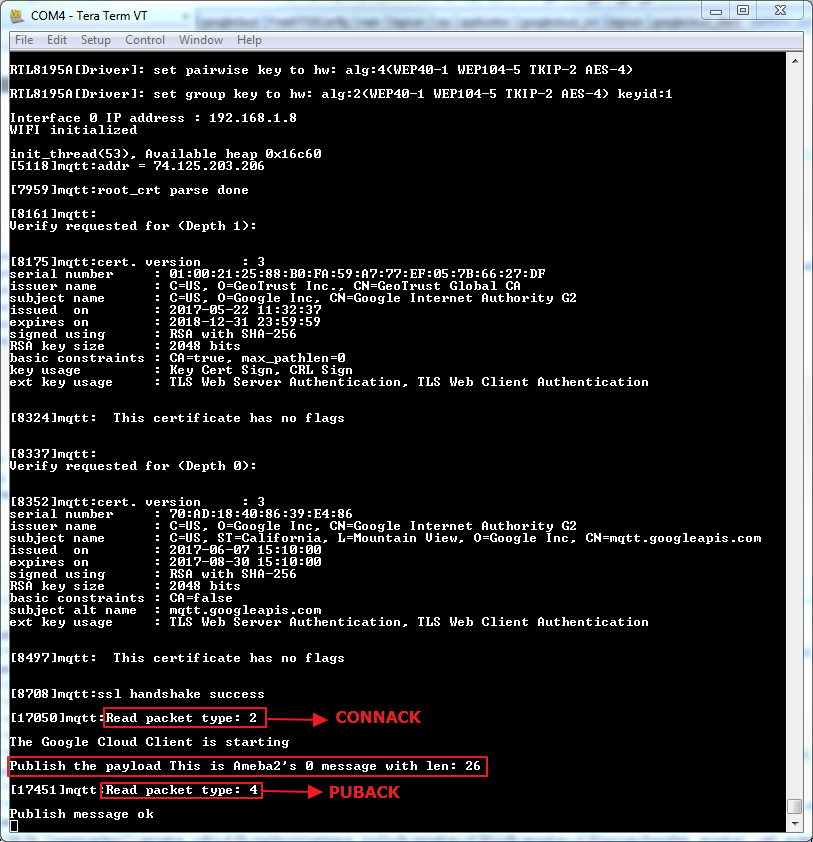
 As soon as the Wi-Fi is connected, the example will start:
 Publishing the payload failed:
Steps taken to resolve issue:
1) Go to the Registries page in GCP Console
2) Under Default telemetry topic, change dropdown box from “NONE” to our created topic
eg. Projects/ameba-1eb0c/topics/amebaTest
3) Update
Publishing the payload failed:
Steps taken to resolve issue:
1) Go to the Registries page in GCP Console
2) Under Default telemetry topic, change dropdown box from “NONE” to our created topic
eg. Projects/ameba-1eb0c/topics/amebaTest
3) Update
Cloud IoT Core is a fully managed service that allows you to easily and securely connect, manage, and ingest data from millions of globally dispersed devices. Cloud IoT Core, in combination with other services on Google Cloud IoT platform, provides a complete solution for collecting, processing, analyzing, and visualizing IoT data in real time to support improved operational efficiency.
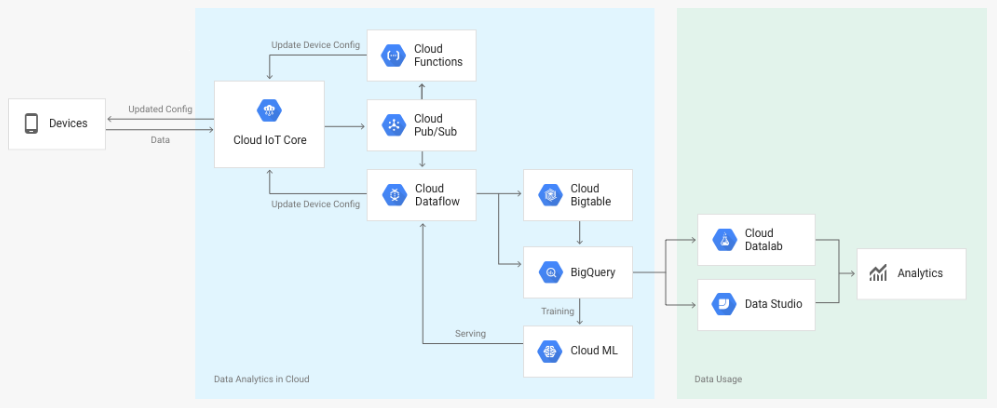 Device telemetry data is forwarded to a Cloud Pub/Sub topic, which can then be used to trigger Cloud Functions. You can also perform streaming analysis with Cloud Dataflow or custom analysis with your own subscribers.
The following diagram summarizes the service components and the flow of data:
Device telemetry data is forwarded to a Cloud Pub/Sub topic, which can then be used to trigger Cloud Functions. You can also perform streaming analysis with Cloud Dataflow or custom analysis with your own subscribers.
The following diagram summarizes the service components and the flow of data:
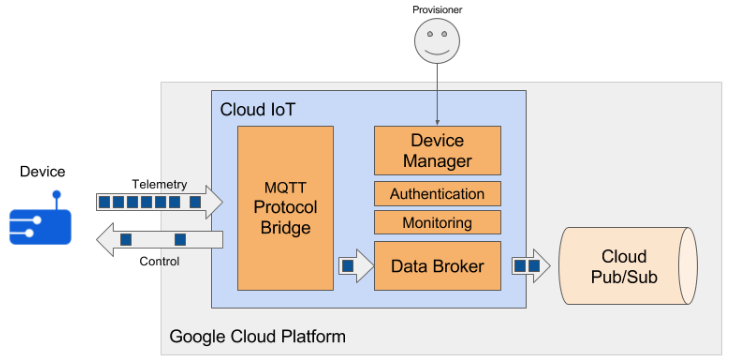 Realtek’s device- Ameba now supports the Google Cloud IoT MQTT Protocol to connect to the Cloud IoT and then publish the Telemetry.
Configure Google Cloud IoT Platform
Device telemetry data is forwarded to a Cloud Pub/Sub topic, which can then be used to trigger Cloud Functions. You can also perform streaming analysis with Cloud Dataflow or custom analysis with your own subscribers.
The following diagram summarizes the service components and the flow of data:
Realtek’s device- Ameba now supports the Google Cloud IoT MQTT Protocol to connect to the Cloud IoT and then publish the Telemetry.
- Pre requirement
Step1: In the Cloud Platform Console, click the project
Step2: At the project list page, select a project or click the Create project
Step3: Input a Project name
Step4: Click Create
Remember the project_id which will be used in both Device Manager and Device.
2. Enable billing for your project
Enable the billing for your project to use Google Cloud Platform features.
https://support.google.com/cloud/answer/6293499#enable-billing
3. Enable the Cloud IoT Core API
Register your application for Google Cloud IoT API in Google Cloud Platform.
Select the project and click Continue.
Click Continue, it will return to the DASHBOARD.
4. Create a Cloud Pub/Sub topic in the Cloud Platform Console
Create a Cloud Pub/Sub topic for the Pub/Sub service.
Step 1: Go to the Cloud PUB/SUB topics page, and Enable API
Step 2: Create a topic
Step 3: Input a topic name and click CREATE
Remember the topic name for later usage.
Step 4: In the Cloud Platform Console, select the topic and click the “SHOW INFO PANEL” button at the top of the page. This will open the IAM permissions editor in the right side panel.
Step 5: Add the member cloud-iot@system.gserviceaccount.com with the role Pub/Sub
Publisher. Then click Add.
- Install the gcloud CLI
$ gcloud components update3. Install the beta component
$ gcloud components install betaIf you’re using a Compute Engine VM, the default installation of gcloud will not allow you to update the components. To enable Cloud IoT Core on a Compute Engine VM, reinstall gcloud by running the following commands:
$ sudo apt-get remove google-cloud-sdk
$ curl https://sdk.cloud.google.com | bash
$ exec -l $SHELL
$ gcloud init
- Registering a sample device
$ gcloud beta iot registries create my-registry
--project=my-iot-project
--region=us-central1
--event-pubsub-topic=projects/my-iot-project/topics/device-events
–project=YOUR_PROJECT_ID: Fill in the project_id got before. Remember the registry_id which value is ‘my_registry’ in the above example command. 2. Create a public/private key pair This step shows you how to create an RSA key pair. Each device should be created with its own unique key. When connecting to Cloud IoT Core, each device creates a JWT signed with its private key, which Cloud IoT Core authenticates using the devices public key. Using OpenSSL to make an RSA key pair, run the following command:
$ openssl req -x509 -nodes -newkey rsa:2048 -keyout rsa_private.pem \
-out rsa_cert.pem -subj "/CN=unused"
You should now have two files: rsa_private.pem and rsa_cert.pem. 3. Create a device To create an RS256 authenticated device using the RSA certificate key, run the following commands:
$ gcloud beta iot devices create my-rs256-device
--project=my-iot-project
--region=us-central1
--registry=my-registry
--public-key path=rsa_cert.pem,type=rs256
–project=YOUR_PROJECT_ID: Fill in the project_id got before. Remember the device_id which value is ‘my-rs256-device’ in the above example command. 4. Create a Cloud Pub/Sub subscription You can also create a Cloud Pub/Sub subscription to receive telemetry events:
$ gcloud beta pubsub subscriptions create
projects/my-iot-project/subscriptions/my-subscription
--topic projects/my-iot-project/topics/device-events
Remember the subscription_id which value is ‘my-subscription’ in the above example command.
Copy and replace the patch files under 4.0b_patch_google_cloud_iot_nonNDA_(v02)\* to standard SDK sdk-ameba-v4.0b_without_NDA_GCC_V1.0.0\*.Make sure all the files in patch are copied to the SDK.
1. example_google_cloud_iot.c
The file location is $sdk\component\common\example\google_cloud_iot\example_google_cloud_iot.c.
Please fill below information of the device.
 After adding the LINE ENDING:
 You can also modify the value of payload which is the message to be published.
Verify example
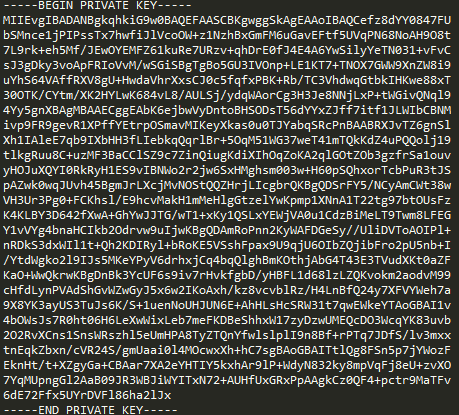
#define project_id "your_project_id"
#define registry_id "your_registry_id"
#define device_id "your_device_id"
#define count 100
static const unsigned char *private_key = \””
The project_id, registry_id and the device_id are set in the previous register device steps. The count is the number of telemetry you will publish. And the private_key is the content in the rsa_private.pem which generated by OpenSSL, remember fill it with LINE ENDING. For the LINE ENDING format, “ should be added at the beginning of each line, \n” \ should be added at the line end if this line is not the last one, and \n” should be added at the last line’s end. The following is the example to show the original pem key and the key after filled with LINE ending. The original is like following:
After adding the LINE ENDING:
You can also modify the value of payload which is the message to be published.
- Compile
Step 2: Open IAR Workbench and open project, click File -> Open -> Workspace, then select project.eww in sdk-ameba-v4.0b_without_NDA\project\realtek_ameba1_va0_example\EWARM-RELEASE
Step3: Build project, click Project -> Rebuild All
Step 4: Download code, click Project -> Download -> Download active application
2. GCC
You can refer UM0096 in sdk-ameba-v4.0b_without_NDA_GCC_V1.0.0\doc\ UM0096 Realtek Ameba build environment setup – gcc.pdf to setup the GCC build environment, it illustrates how to build the SDK under GCC environment on both Windows and Linux platform.
Here just shows how to build on Windows 7 platform by using Cygwin.
Step 1: Connect board to the PC with micro-USB cable. It requires installing “serial to USB driver” which can be found in sdk-ameba-v4.0b_without_NDA_GCC_V1.0.0\tools\serial_to_usb\ mbedWinSerial_16466.
Step 2: Open Cygwin terminal and use cd command to change directory to project\realtek_ameba1_va0_example\GCC-RELEASE
$ cd /cygdrive/SDK_LOCATION/project/realtek_ameba1_va0_example/GCC-RELEASE
Step3: Build project, use make command.
$ makeIf the terminal contains “Image manipulating” output message means that the images have been built successfully.
Step 4: Download code. Copy the image file ram_all.bin in project\realtek_ameba1_va0_example\GCC-RELEASE\application\Debug\bin to the board which is the MBED
- Run the device
ATW0 Network set SSID
ATW1 Network set passphrase
ATW2 Network set Key ID
ATWC Join a network
For example, to connect an AP with WPA2 mode, the Command sequence:
#ATW0=SSID
#ATW1=passphrase
#ATWC
As soon as the Wi-Fi is connected, the example will start:
Publishing the payload failed:
Steps taken to resolve issue:
1) Go to the Registries page in GCP Console
2) Under Default telemetry topic, change dropdown box from “NONE” to our created topic
eg. Projects/ameba-1eb0c/topics/amebaTest
3) Update
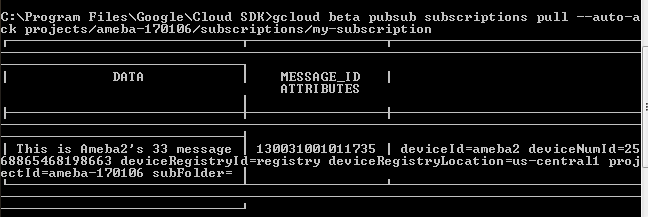
- Verify
$ gcloud beta pubsub subscriptions pull --auto-ack \
projects/my-iot-project/subscriptions/my-subscription