UART介紹
- UART使用了兩條線讓雙方可以同時傳送資料。其中一條是Transmitting, 另一條則是Receiving,雙方使用約定好的頻率(baud rate)來傳資料。Arduino 稱呼 UART 為Serial, 在Arduino Uno上只有一組硬體UART,並且這組UART主要被當作印出訊息使用(即Log UART),所以當Arduino要使用硬體的UART時,就會占用Log UART的資源。為了提供多組UART, Arduino Uno利用軟體將Serial Pin模擬成UART的行為,稱之為Software Serial。Ameba除了Log UART之外,還提供多組硬體的UART。為了相容於Arudino的Software Serial API,Ameba在取名上沿用Software Serial,但底層是硬體而不是軟體模擬。
材料準備
- Ameba x 1
- USB to TTL Adapter x 1
範例說明
這個範例裡,我們使用USB to TTL Adapter伴演UART的其中一端,另一端則是Ameba。
USB to TTL Adapter送出資料給Ameba,Ameba回傳相同的資料,最後顯示在螢幕上。
USB to TTL Adapter送出資料給Ameba,Ameba回傳相同的資料,最後顯示在螢幕上。
- 安裝USB to TTL Adapter
USB to TTL Adapter是個將USB轉成Seral介面的晶片。它一般會有4根腳,分別是3V3(或5V), GND, TX, RX。在使用USB to TTL Adapter時,通常都需要安裝驅動程式。如果你的晶片是FTDI的,Windows會上網找驅動程式並自動安裝,或者也可以自己找驅動程式。
安裝完驅動程式之後, 會在裝置管理員找到對應的Serial Port, 像圖中我的FTDI USB to TTL Adapter在COM8, 而Silicon USB to TTL Adapter則在COM6:

- 執行範例
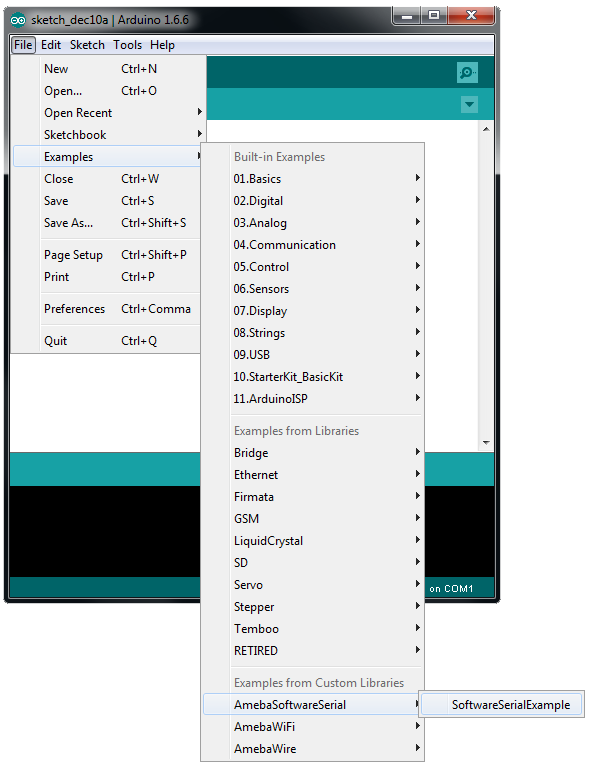
首先先打開SoftwareSerialExamle範例, 它在 “File” -> “Examples” -> “AmebaSoftwareSerial” -> “SoftwareSerialExample”:
並且我們這樣接線, USB to TTL Adapter的TX接到Ameba的D0(即RX), USB to TTL Adapter的RX接到 Ameba的D1(即TX):

RTL8710 接線圖如下:
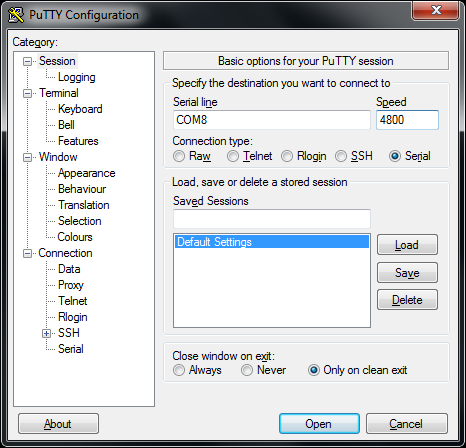
接著我們打開Serial Port Terminal, 常見的Serial Port Terminal有Putty, Tera Term。我們以Putty說明如何設定, 先將 Connection Type選擇 Serial, 並且將 Serial line填入 USB to TTL Adapter所在的Port, (Ex. COM8)。Speed指的就是USB的baud rate,需要與Serial的另一端做搭配,這個在範例裡為4800,所以我們設定4800。
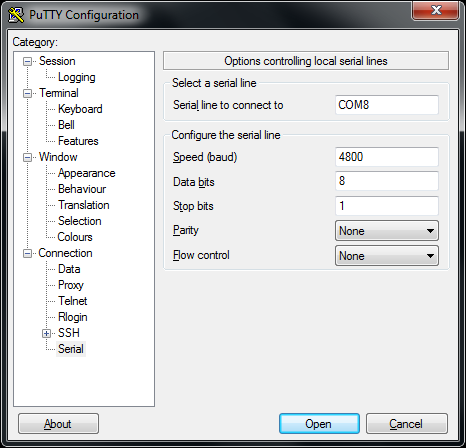
接著我們切換左邊的Category到 Serial的頁面,其中Data bits為8, Stop bits為1, Stop bits為1, Parity為None, Flow control為None。
設定完之後按下Open, 並且按下Ameba的Reset按鈕,Putty就會出現 “Hello, world?” 的訊息, 這時候你在鍵盤上敲字,會經由USB to TTL Adapter的TX送到Ameba的Serial RX, 在程式碼裡面再送到Ameba的Serial TX, 最後由USB to TTL Adapter的RX接收並印出來。所以如果我們敲這個訊息 “I am fine”, 就會出現這樣:

程式碼說明
首先需要設定UART的Baud rate, 使用SoftwareSerial:Begin():
https://www.arduino.cc/en/Reference/SoftwareSerialBegin
使用write送出資料, 並且使用Software:available()來檢查是否有資料送進來:
https://www.arduino.cc/en/Reference/SoftwareSerialAvailable
如果有資料進來, 就使用read將資料讀進來。
https://www.arduino.cc/en/Reference/SoftwareSerialBegin
使用write送出資料, 並且使用Software:available()來檢查是否有資料送進來:
https://www.arduino.cc/en/Reference/SoftwareSerialAvailable
如果有資料進來, 就使用read將資料讀進來。
